Sunday, September 22, 2013

Analog Inputs


Discussion:

We've investigated using the Arduino to read in a digital value. In this case, digital means that a quantity can only have one of two values, namely HIGH (synonymous with "1" or +5 V) or LOW (synonymous with "0" or ground).

Click through the break to begin this activity.

Tuesday, September 17, 2013

A Better Button


Components needed for this lab:

  • push-button momentary switch
  • (1) 1-k resistor
  • (1) 10-k resistor
  • several hook-up wires
Discussion:
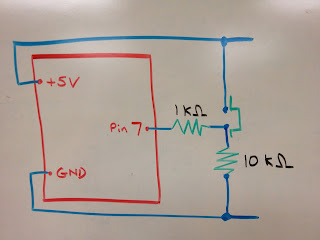
  • Use the diagram above to build the circuit with the button
  • In this case, the 10-k resistor is called a "pull-down" resistor because it normally "pulls" pin 7 to ground. The default "reading" of pin 7 will be LOW since it is connected to ground.
  • When the button is depressed, pin 7 is also connected to +5 volts. Since the button itself offers almost zero resistance, pin 7 is "closer" to 5 V than ground, and so it will read "HIGH". 
  • Notice that when the button is depressed, the +5-volt rail is connected to the ground rail and current will flow between the two. That's why it is imperative to use a fairly large (in this case, a 10-k) resistor--we don't want too much current flowing in that branch of the circuit, overheating the button, and possibly burning out the pins of our Arduino!
Click through the break for more instructions... ...

Thursday, September 12, 2013

Arduino Link

CC image licence BY-NC-SA 3.0